
Sebastian Schocke
Verified Expert in Engineering
Sebastian是一名拥有17年设计经验的高级开发人员, developing, 以及在广泛的技术上支持软件.
Expertise
Previously At

Sebastian是一名拥有17年设计经验的高级开发人员, developing, 以及在广泛的技术上支持软件.
今天我们来看看积分有多简单 JSON web token (JWT) authentication into your Angular 6 (或以后)单页应用程序(SPA). 让我们从一些背景开始.
这里最简单和最简洁的答案是它们方便、紧凑和安全. 让我们来详细看看这些说法:
这一切归根结底就是您拥有一种安全有效的方式来验证用户, 然后验证对API端点的调用,而无需解析任何数据结构或实现自己的加密.
因此,有了一些背景知识,我们现在可以深入了解它在实际应用程序中的工作方式. 对于本例,我将假设我们有一个Node.js服务器托管我们的API,我们是 developing an SPA todo list using Angular 6. 让我们来看看这个API结构:
/auth → POST (发布用户名和密码以验证并接收回JWT)
/todos → GET (为用户返回待办事项列表项的列表)
/todos/{id} → GET (返回一个特定的待办事项列表项)
/users → GET (returns a list of users)
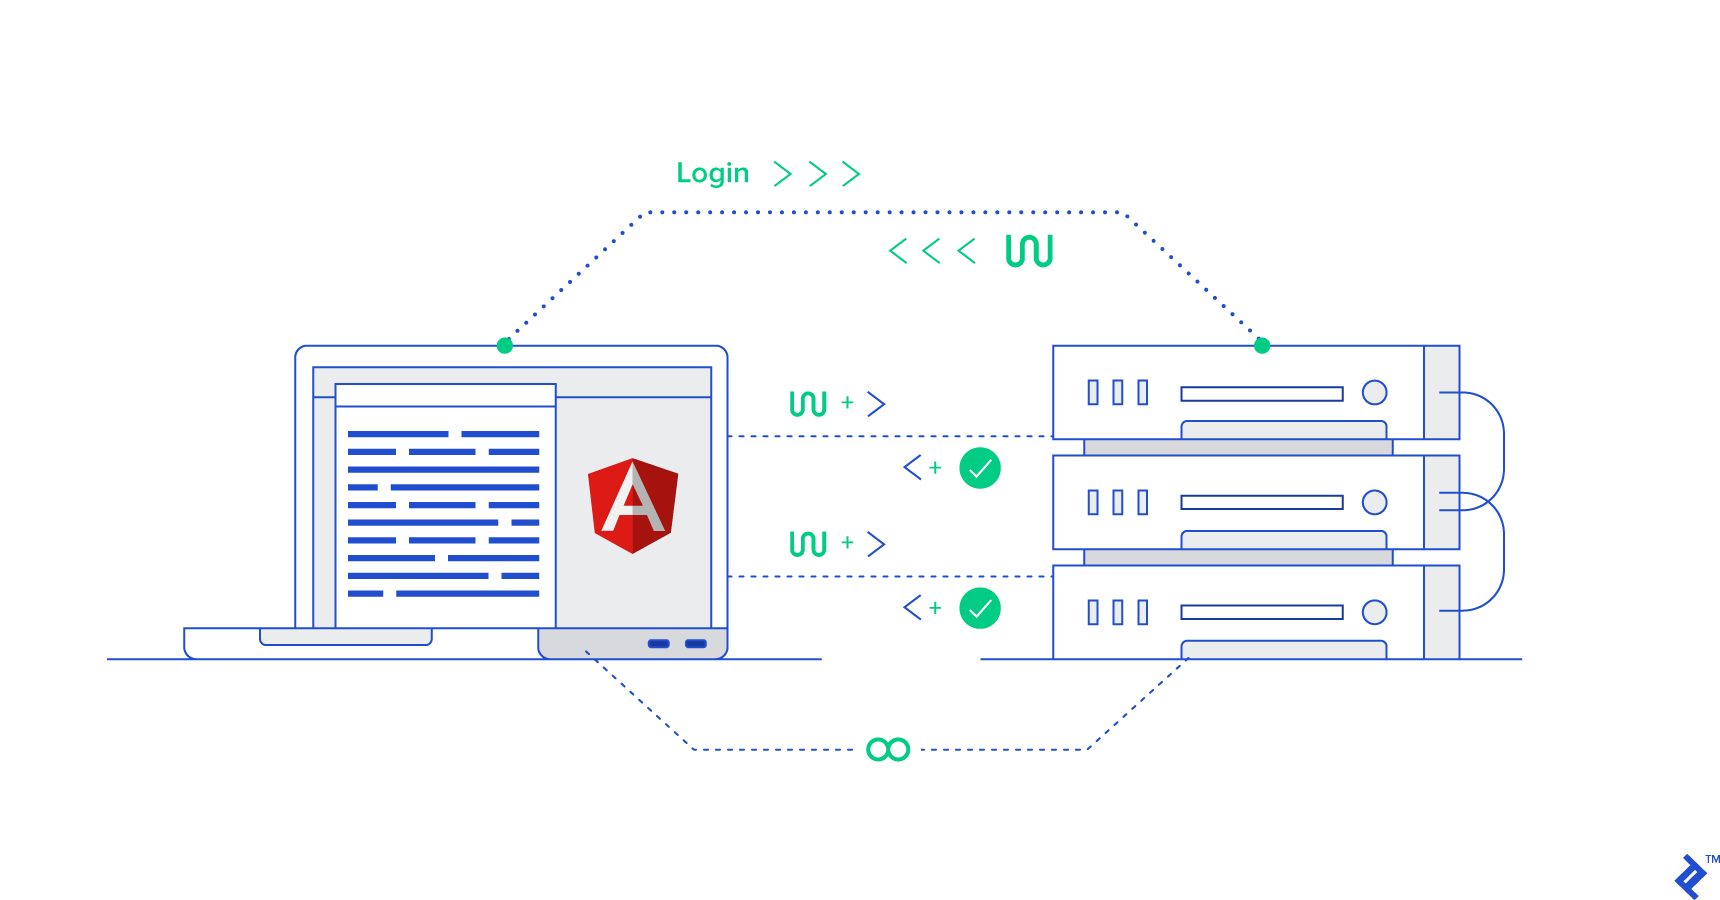
我们将很快完成这个简单应用程序的创建, but for now, 让我们把注意力集中在理论上的相互作用上. 我们有一个简单的登录页面,用户可以在其中输入用户名和密码. 提交表单时,它将该信息发送到 /auth endpoint. 然后,Node服务器可以以任何合适的方式对用户进行身份验证(数据库查找), 查询其他web服务, etc.),但最终端点需要返回JWT.
本例的JWT将包含几个 reserved claims, and some private claims. 保留声明只是jwt推荐的键值对,通常用于身份验证, 而私有声明是只适用于我们的应用的键值对:
Reserved Claims
iss: Issuer of this token. 通常是服务器的FQDN, 但是可以是任何东西,只要客户端应用程序知道需要它.exp:此令牌的到期日期和时间. 这是从格林威治时间1970年1月1日午夜开始的秒数(Unix时间).
nbf:在timestamp之前无效. 不常使用,但给出了有效性窗口的下界. Same format as exp.
Private Claims
uid:登录用户的用户ID.role:登录用户的角色.我们的信息将被base64编码,并使用带有共享密钥的HMAC进行签名 todo-app-super-shared-secret. 下面是JWT的一个示例:
eyJhbGciOiJIUzI1NiIsInR5cCI6IkpXVCJ9.eyJpc3MiOiJ0b2RvYXBpIiwibmJmIjoxNDk4MTE3NjQyLCJleHAiOjE0OTgxMjEyNDIsInVpZCI6MSwicm9sZSI6ImFkbWluIn0.ZDz_1vcIlnZz64nSM28yA1s-4c_iw3Z2ZtP-SgcYRPQ
This 字符串是所有我们需要确保我们有一个有效的登录, 要知道连接的是哪个用户, 甚至知道用户的角色.
大多数库和应用程序继续存储这个JWT localStorage or sessionStorage 为了方便检索,但这只是常见的做法. 如何使用令牌取决于您,只要您可以为将来的API调用提供它.
Now, 当SPA想要调用任何受保护的API端点时, 它只需要沿着令牌发送 Authorization HTTP header.
授权:承载{JWT令牌}
Note再一次,这是很常见的做法. JWT没有规定将自身发送到服务器的任何特定方法. 您也可以将它附加到URL,或者在cookie中发送它.
一旦服务器接收到JWT, it can decode it, 使用HMAC共享密钥确保一致性, and check expiry using the exp and nbf fields. It could also use the iss 字段,以确保它是该JWT的原始签发方.
一旦服务器对令牌的有效性感到满意, 可以使用存储在JWT中的信息. For instance, the uid 为我们提供了发出请求的用户的ID. 对于这个特定的示例,我们还包括 role field, 这使我们能够决定用户是否应该能够访问特定端点. (你是否相信这个信息, 或者更确切地说,要执行数据库查找取决于所需的安全级别.)
函数getTodos (jwtString)
{
  var token = JWTDecode(jwtstring);
  if( Date.now() < token.nbf*1000) {
    抛出新的错误('令牌尚未有效');
  }
  if( Date.now() > token.exp*1000) {
    抛出新的错误('令牌已过期');
  }
  if( token.iss != 'todoapi') {
    抛出新的错误('这里未发出令牌');
  }

  var userID = token.uid;
  var todos = loadUserTodosFromDB(userID);

  return JSON.stringify(todos);
}
要继续学习,您需要有最新版本的Node.js (6.x or later), npm (3.X或更高版本),并安装了angular-cli. If you need to install Node.Js中包含了npm,请按照说明操作 here. Afterward angular-cli can be installed by using npm (or yarn, if you’ve installed it):
# installation using npm
npm install -g @angular/cli

# installation using yarn
全局添加@angular/cli
我不会详细介绍我们在这里使用的Angular 6样板, but for the next step, 我已经创建了一个Github存储库来保存一个小的待办事项应用程序,以说明向应用程序添加JWT身份验证的简单性. 只需使用以下命令克隆它:
git clone http://github.com/sschocke/angular-jwt-todo.git
cd angular-jwt-todo
git checkout pre-jwt
The git checkout pre-jwt 命令切换到未实现JWT的命名版本.
里面应该有两个文件夹叫做 server and client. 服务器是一个Node API服务器,它将托管我们的基本API. 客户端是我们的Angular 6应用.
首先,安装依赖项并启动API服务器.
cd server

# installation using npm
npm install

#或安装使用纱线
yarn

node app.js
您应该能够遵循这些链接并获得数据的JSON表示形式. 现在,在我们进行身份验证之前,我们已经硬编码了 /todos 返回任务的端点 userID=1:
userID=1
开始使用客户端应用程序, 我们还需要安装依赖项并启动开发服务器.
cd client

# using npm
npm install
npm start

# using yarn
yarn
yarn start
Note根据您的网速,下载所有依赖项可能需要一段时间.
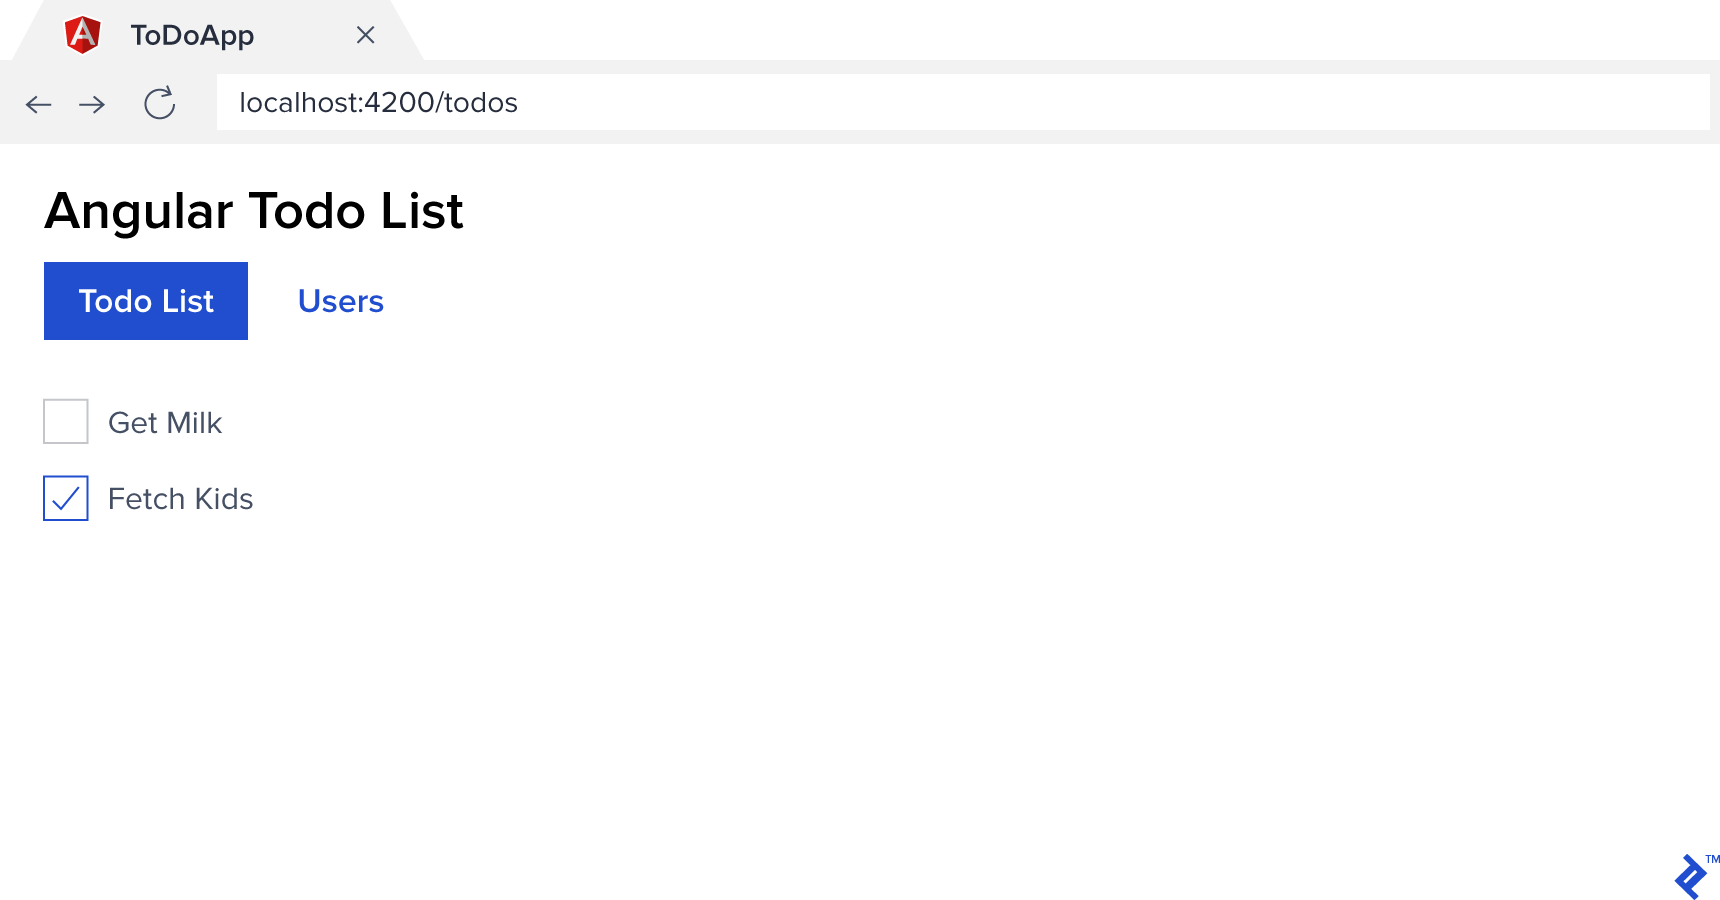
If all is going well, 现在,当导航到http://localhost:4200:时,您应该看到类似这样的内容
添加对JWT身份验证的支持, 我们将使用一些可用的标准库来简化它. You can, of course, 放弃这些便利,自己实现一切, 但这超出了我们的范围.
首先,让我们在客户端安装一个库. 它是由 Auth0,它是一个库,允许您添加 cloud-based authentication to a website. 使用库本身并不需要使用它们的服务.
cd client

# installation using npm
安装@auth0/angular-jwt

# installation using yarn
yarn add @auth0/angular-jwt
我们马上就会讲到代码,但是在我们讲到代码的同时,让我们也来设置一下服务器端. We’ll use the body-parser, jsonwebtoken, and express-jwt 库使Node能够理解JSON POST主体和jwt.
cd server

# installation using npm
NPM安装body-parser jsonwebtoken express-jwt

# installation using yarn
Yarn添加body-parser jsonwebtoken express-jwt
首先,我们需要一种在给用户令牌之前对其进行身份验证的方法. For our simple demo, 我们将使用硬编码的用户名和密码设置一个固定的身份验证端点. 这可以根据应用程序的需要简单或复杂. 重要的是发送回JWT.
In server/app.js 在另一个条目下面添加一个条目 require lines as follows:
const bodyParser = require('body-parser');
Const JWT = require('jsonwebtoken');
const expressJwt = require('express-jwt');
As well as the following:
app.use(bodyParser.json());

app.Post ('/api/auth', function(req, res) {
  const body = req.body;

  const user = USERS.find(user => user.username == body.username);
  if(!user || body.password != 'todo') return res.sendStatus(401);

  var token = jwt.sign({userID: user.id}, 'todo-app-super-shared-secret', {expiresIn: '2h'});
  res.send({token});
});
这大部分是基本的JavaScript代码. 我们得到传递给 /auth endpoint, 查找与该用户名匹配的用户, 检查用户和密码是否匹配, and return a 401 Unauthorized HTTP error if not.
重要的部分是令牌生成,我们将按三个参数对其进行分解. The syntax for sign is as follows: jwt.sign(payload, secretOrPrivateKey, [options, callback]), where:
payload 是否要在令牌中编码的键值对的对象字面量. 然后,任何拥有解密密钥的人都可以从令牌中解码该信息. 在我们的示例中,我们对 user.id 这样,当我们在后端再次接收令牌进行身份验证时, 我们知道要处理的是哪个用户.secretOrPrivateKey 是HMAC加密共享密钥-这是我们在应用中使用的, 为了简单起见—或者RSA/ECDSA加密私钥.options 表示可以以键值对的形式传递给编码器的各种选项. 通常我们至少要说明 expiresIn (becomes exp reserved claim) and issuer (iss 保留声明),这样令牌就不会永远有效, 服务器可以检查它最初是否发出了令牌.callback 是一个函数后调用编码完成, 应该异步处理标记的编码吗.(You can also read about more details on options 以及如何使用公钥加密而不是共享密钥.)
要让Angular 6与我们的JWT一起工作,使用下面的命令非常简单 angular-jwt. Simply add the following to client/src/app/app.modules.ts:
从'@auth0/angular-jwt'导入{JwtModule};
// ...
导出tokenGetter() {
  return localStorage.getItem('access_token');
}

@NgModule({
// ...
  imports: [
    BrowserModule,
    AppRoutingModule,
    HttpClientModule,
    FormsModule,
    // Add this import here
    JwtModule.forRoot({
      config: {
        tokenGetter: tokenGetter,
        whitelistedDomains: [' localhost: 4000 '),
        blacklistedRoutes: [' localhost: 4000 / api /认证']
      }
    })
  ],
// ...
}
这基本上是所有需要的. 当然,我们还需要添加一些代码来进行初始身份验证,但是 angular-jwt 库负责在每个HTTP请求中发送令牌.
tokenGetter() 函数完全按照它所说的去做,但是如何实现完全取决于您. 我们选择返回保存的令牌 localStorage. 当然,您可以自由地提供您想要的任何其他方法,只要它返回 JSON web token encoded string.whiteListedDomains 选项,因此您可以限制将JWT发送到哪些域, 所以公共api也不会接收JWT.blackListedRoutes 选项允许您指定不应该接收JWT的特定路由,即使它们位于白名单域. For example, 身份验证端点不需要接收它,因为没有意义:无论如何,当调用令牌时,它通常为空.方法为给定用户生成JWT /auth 我们已经在Angular上完成了管道工作,为每个HTTP请求发送JWT. 很好,但您可能会指出,对于用户来说,绝对没有任何改变. And you would be correct. 我们仍然可以导航到应用程序中的每个页面, 我们甚至不需要发送JWT就可以调用任何API端点. Not good!
我们需要更新我们的客户端应用程序来关注谁登录, 并更新我们的API以要求JWT. Let’s get started.
我们需要一个新的Angular组件来登录. 为简洁起见,我将尽可能保持简单. 我们还需要一个服务来处理所有的身份验证需求 Angular Guard 以保护在登录之前不应该访问的路由. 我们将在客户机应用程序上下文中执行以下操作.
cd client
Ng组件login——spec=false——inline-style
Ng服务auth——flat——spec=false
Ng guard auth——flat——spec=false
This should have generated four new files in the client folder:
src/app/login/login.component.html
src/app/login/login.component.ts
src/app/auth.service.ts
src/app/auth.guard.ts
接下来,我们需要为我们的应用程序提供认证服务和保护. Update client/src/app/app.modules.ts:
导入{AuthService}./auth.service';
import { AuthGuard } from './auth.guard';

// ...

providers: [
  TodoService,
  UserService,
  AuthService,
  AuthGuard
],
然后更新路由 client/src/app/app-routing.modules.ts 使用身份验证保护并为登录组件提供路由.
// ...
导入{LoginComponent}./login/login.component';
import { AuthGuard } from './auth.guard';

const routes: Routes = [
  {path: 'todos',组件:TodoListComponent, canActivate: [AuthGuard]},
  {path: 'users', component: UserListComponent, canActivate: [AuthGuard]},
  {path: 'login',组件:LoginComponent},
  // ...
Finally, update client/src/app/auth.guard.ts 内容如下:
从“@angular/core”中导入{Injectable};
从“@angular/ Router”中导入{Router、CanActivate、ActivatedRouteSnapshot、RouterStateSnapshot};

@Injectable()
导出类AuthGuard实现CanActivate {
  构造函数(私有路由器:路由器){}

  canActivate(next: ActivatedRouteSnapshot, state: RouterStateSnapshot) {
    if (localStorage.getItem('access_token')) {
      return true;
    }

    this.router.navigate(['login']);
    return false;
  }
}
对于我们的演示应用程序,我们只是检查本地存储中是否存在JWT. 在实际应用程序中,您将解码令牌并检查其有效性、过期等. For example, you could use JwtHelperService for this.
At this point, 我们的Angular应用现在总是会把你重定向到登录页面,因为我们无法登录. 让我们从中的身份验证服务开始解决这个问题 client/src/app/auth.service.ts:
从“@angular/core”中导入{Injectable};
从“@angular/common/http”中导入{HttpClient};
从'rxjs'中导入{Observable};
从'rxjs/operators'中导入{map};

@Injectable()
export class AuthService {
  构造函数(私有http: HttpClient) {}

  login(username: string, password: string): Observable {
    return this.http.post<{token: string}>('/api/auth', {username: username, password: password})
      .pipe(
        map(result => {
          localStorage.setItem(“access_token”的结果.token);
          return true;
        })
      );
  }

  logout() {
    localStorage.removeItem('access_token');
  }

  getloggedin (): boolean {
    return (localStorage.getItem('access_token') !== null);
  }
}
我们的认证服务只有两个功能, login and logout:
login POSTs the provided username and password 到我们的后端,设置 access_token in localStorage if it receives one back. 为简单起见,这里没有错误处理.
logout simply clears access_token from localStorage,需要在再次访问任何进一步的内容之前获得新的令牌.loggedIn 是一个布尔属性,我们可以快速使用它来确定用户是否登录.最后是登录组件. 这些与实际使用JWT没有关系,所以可以随意复制粘贴 client/src/app/login/login.components.html:
{{error}}
And client/src/app/login/login.components.ts will need:
从“@angular/core”中导入{Component, OnInit};
导入{AuthService}../auth.service';
从“@angular/ Router”中导入{Router};
从'rxjs/operators'中导入{first};

@Component({
  selector: 'app-login',
  templateUrl: './login.component.html'
})
导出类LoginComponent {
  public username: string;
  public password: string;
  public error: string;

  构造函数(私有auth: AuthService,私有router: router) {}

  public submit() {
    this.auth.login(this.username, this.password)
      .pipe(first())
      .subscribe(
        result => this.router.navigate(['todos']),
        err => this.error = '无法验证'
      );
  }
}
瞧,我们的Angular 6登录示例:
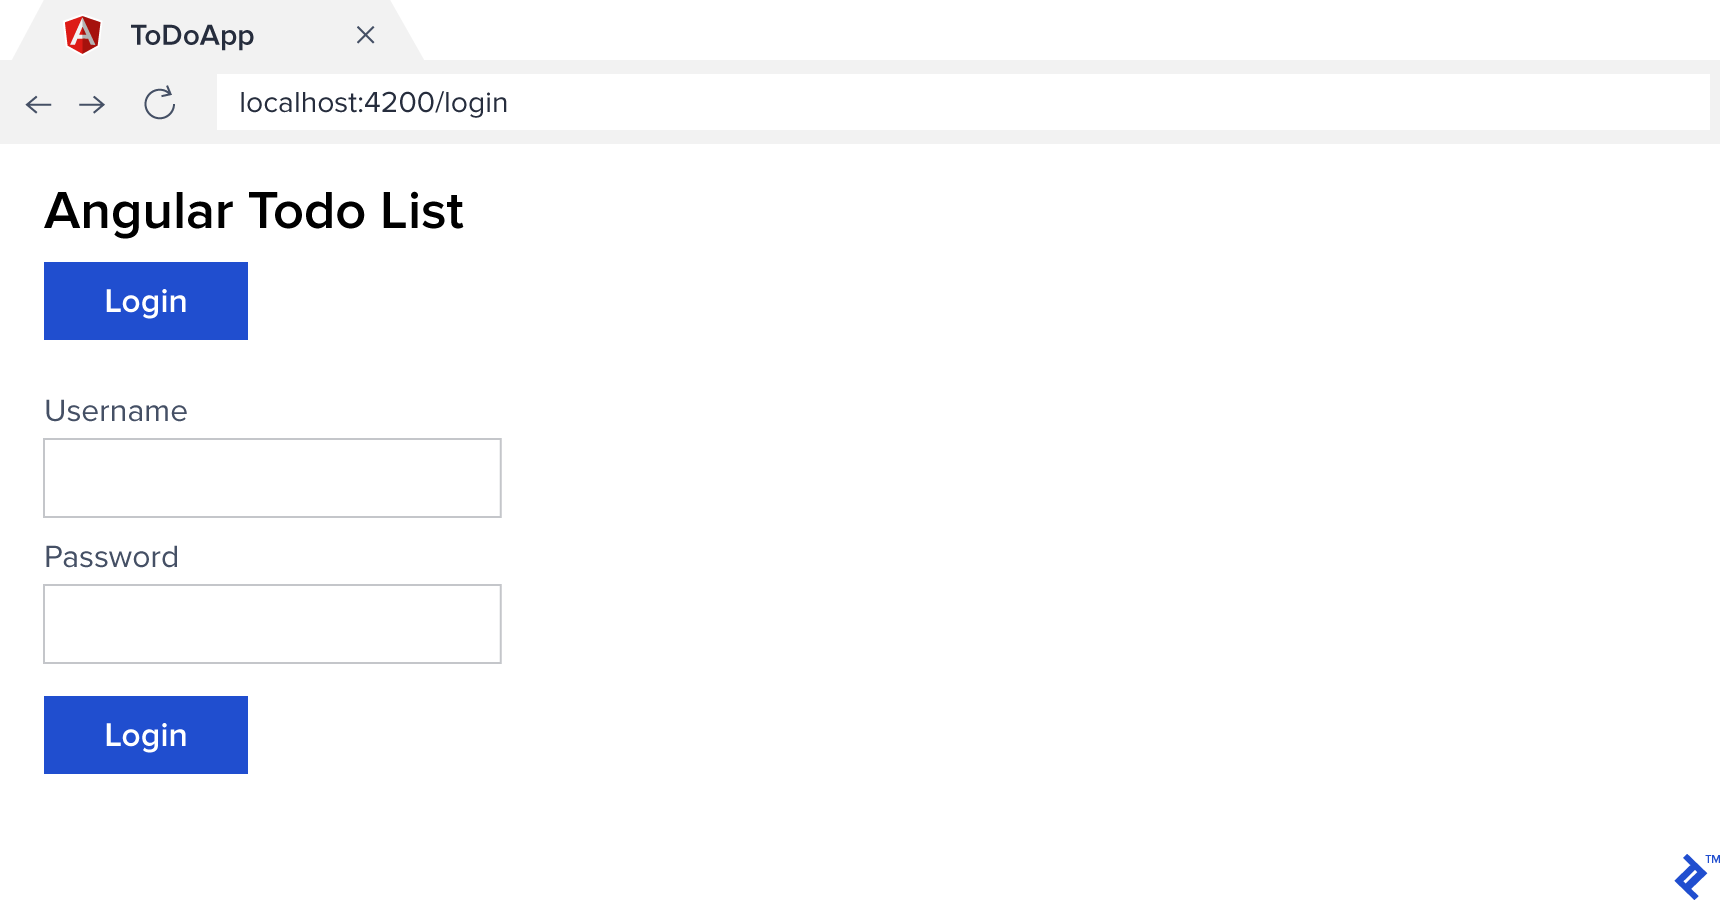
在这个阶段,我们应该能够登录 (using jemma,paul, or sebastian with the password todo) 再次看到所有的屏幕. 但是我们的应用程序显示了相同的导航标头,并且无论当前状态如何都无法注销. 在继续修复API之前,让我们先修复这个问题.
In client/src/app/app.component.ts,将整个文件替换为以下内容:
从“@angular/core”中导入{Component};
从“@angular/ Router”中导入{Router};
导入{AuthService}./auth.service';

@Component({
  selector: 'app-root',
  templateUrl: './app.component.html',
  styleUrls: ['./app.component.css']
})
export class AppComponent {
  构造函数(私有auth: AuthService,私有router: router) {}

  logout() {
    this.auth.logout();
    this.router.navigate(['login']);
  }
}
And for client/src/app/app.component.html replace the section with the following:
我们已经使我们的导航上下文感知,它应该只显示某些项目取决于用户是否登录. auth.loggedIn 当然,可以在任何可以导入身份验证服务的地方使用吗.
You may be thinking, 这太棒了……一切看起来都运转得很好. 但是尝试使用所有三个不同的用户名登录, 你会注意到:它们都返回相同的待办事项列表. 如果我们看一下API服务器, 我们可以看到每个用户都这样做, in fact, 有自己的物品清单吗, so what’s up?
还记得我们刚开始的时候,我们编写了 /todos 始终返回todo列表的API端点 userID=1. 这是因为我们没有任何方法知道谁是当前登录的用户.
Now we do, 因此,让我们看看保护端点并使用JWT中编码的信息来提供所需的用户标识是多么容易. 最初,将这一行添加到您的 server/app.js 就在最后一个下面 app.use() call:
app.使用(expressJwt({秘密:“todo-app-super-shared-secret”}).除非({路径:[/ api /身份验证的]}));
We use the express-jwt middleware, 告诉它共享的秘密是什么, 并指定不需要JWT的路径数组. And that’s it. 不需要触摸每一个端点,创建 if 所有的语句,或者任何东西.
在内部,中间件做了一些假设. 例如,它假设 Authorization 的通用JWT模式 Bearer {token}. (如果不是这样的话,这个库有很多选项可以自定义它的工作方式. See express-jwt Usage for more details.)
我们的第二个目标是使用JWT编码的信息来找出谁在进行呼叫. Once again express-jwt comes to the rescue. 作为读取令牌并验证它的一部分, 它将我们在签名过程中发送给变量的编码有效负载设置为 req.user in Express. 然后,我们可以使用它来立即访问我们存储的任何变量. In our case, we set userID 等于经过身份验证的用户的ID,因此我们可以直接使用它作为 req.user.userID.
Update server/app.js again, and change the /todos 端点读取如下:
res.send(getTodos(req.user.userID));

And that’s it. 我们的API现在可以防止未经授权的访问, 我们可以安全地确定在任何端点中经过身份验证的用户是谁. 我们的客户机应用程序也有一个简单的身份验证过程, 我们编写的任何调用API端点的HTTP服务都会自动附加一个身份验证令牌.
如果您克隆了Github存储库, 只是想看看最终的结果, 你可以使用以下命令查看代码的最终形式:
git checkout with-jwt
我希望您发现本演练对添加有价值 JWT authentication to your own Angular apps. Thanks for reading!
在编程术语中,令牌有许多定义. 在安全性和身份验证方面,它只是一个不透明的字符串,它编码了少量可以轻松传输和存储的信息, 但几乎没有机会与任何其他标记相碰撞.
基于令牌的身份验证仅仅意味着将验证和授权用户所需的数据编码为令牌, 然后在访问受保护的资源时使用可选的加密签名令牌进行授权,而不是使用用户名/密码组合.
JWT是JSON Web Token的缩写, 也就是说它是一个JSON对象,头文件, payload, and signature. 当与SSL等其他技术一起使用时,它代表了一种在网络上的双方之间交换身份验证信息的安全方法.
OAuth 2.0是用于跨大量受支持平台执行授权的标准协议. 例如,b谷歌、Facebook和OpenID都使用OAuth 2.0. 它定义了使用其提供的身份验证服务器进行身份验证和访问受保护资源所需遵循的步骤和格式.
Sebastian是一名拥有17年设计经验的高级开发人员, developing, 以及在广泛的技术上支持软件.
 作者都是各自领域经过审查的专家,并撰写他们有经验的主题. 我们所有的内容都经过同行评审,并由同一领域的Toptal专家验证.
世界级的文章,每周发一次.
世界级的文章,每周发一次.
Join the Toptal® community.
