EhCache 是一种广泛使用的, 纯Java缓存,可以很容易地与大多数流行的Java框架集成, 比如Spring和Hibernate. 它通常被认为是Java应用程序最方便的选择,因为它可以很容易地集成到项目中. In particular:
In short, EhCache is a great choice for any pure-Java application.
Additionally, EhCache Spring注解 通过简单地向可缓存方法中添加注解,可以无缝集成到任何Spring应用程序中, without modifying the method implementations.
而EhCache提供了直接的, rich APIs to manipulate the cache programmatically, 本文主要关注 增强Spring应用程序 in a less intrusive way with EhCache Spring注解. 我们将设置一个Spring MVC项目,并在Tomcat中部署一个RESTful web服务. Then, EhCache will be integrated to the web service.
我们将在一个示例项目的上下文中演示EhCache注解. We’ll set up a Spring 基于mvc的web服务 Tomcat 8 server.
我在Eclipse中开发了这个项目,可以按照说明进行安装 here.
The latest stable version of Tomcat, Tomcat 8, can be downloaded here.
Of course, these specific platforms are not a requirement for EhCache; you can always choose your favorite IDE and server.
The EhCache Spring注解 JAR is available here. 正如我们所看到的,每个版本都有两个jar:一个有依赖项,一个没有. The one with dependencies also includes EhCache 2 and Spring 3, which are required for EhCache annotations to work. 如果我们下载带有依赖项的版本并将其添加到构建路径中,设置起来会更容易.
EhCache Spring注解 is also compatible with Spring 4, 虽然它必须单独配置. It’s not clear if the project will support EhCache 3 in the near future. 对于那些正在使用的人, 或者打算使用, EhCache 3, the annotation approach discussed in this article is not advised.
Finally, we will be using Maven to manage everything. Maven是与大多数Eclipse安装一起预打包的,但也可以获得它 here. Spring MVC和EhCache Spring annotation依赖可以很容易地添加, 如本文后面所示.
If you have never set up a Spring project before, you may also find Stefan Varga关于这个主题的帖子 informative.
For this demonstration, we will set up a basic project using the Maven archetype maven-archetype-webapp. The overall file structure will look like this:
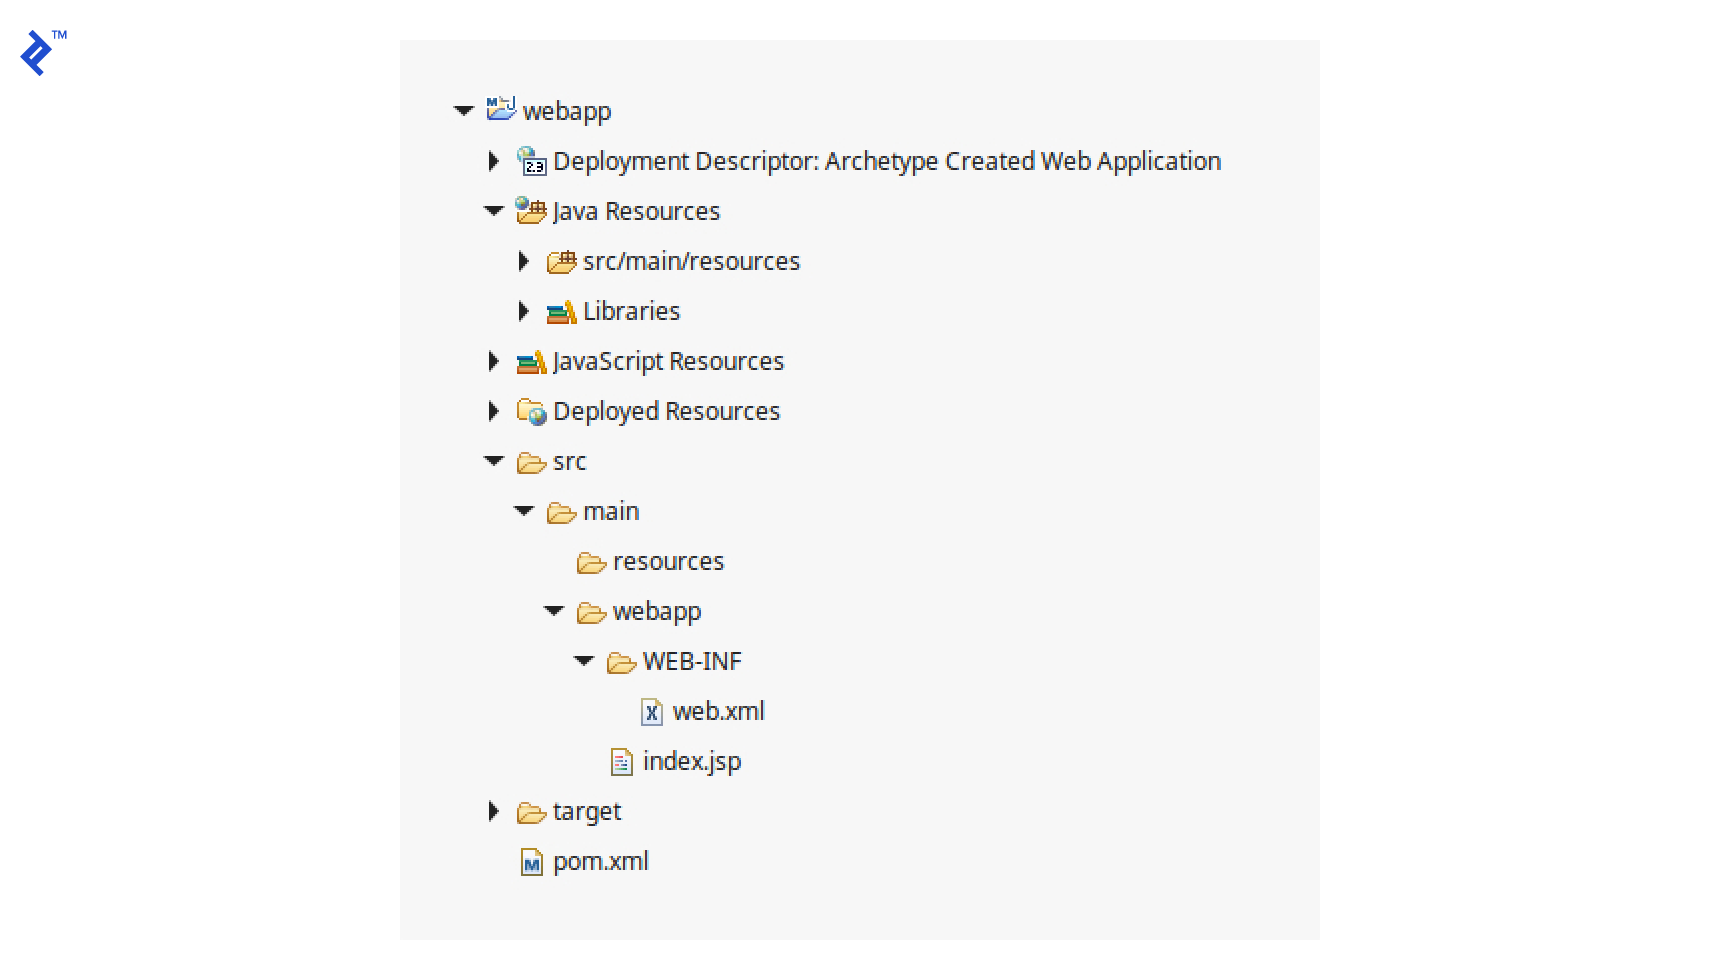
创建一个目录, src/main/java,有三种包装: com.toptal.blog, com.toptal.blog.cache, and com.toptal.blog.service. 我们的应用程序源代码将放在这些包中,如下所述.
Let’s define a Tomcat servlet called “springrest” in web.xml:
   ...

      springrest

         org.springframework.web.servlet.DispatcherServlet

      1


      springrest
      /*
Unless explicitly specified otherwise, a Spring MVC DispatcherServlet will look for an XML configuration file named {servlet-name} servlet.xml 在目录中 WEB-INF. 让我们创建一个名为 springrest-servlet.xml. To enable Spring process controller methods annotated with @RequestMapping,让我们简单地加上 springrest-servlet.xml 配置是:
现在我们的项目已经配置好了,让我们实现一个简单的“消息服务”API. 在我们的基本包中, project.toptal.blog, we’ll add SpringRestControllerWithEhCache.java,其中一个GET方法根据ID获取消息,一个POST方法根据ID设置消息:
@RestController
@RequestMapping("/")
public class SpringRestControllerWithEhCache {
   @Autowired
   MessageService MessageService;

   @RequestMapping( value = "/message/{id}", method = RequestMethod.GET )
   public String getMessage( @PathVariable Integer id ) {
      字符串消息= messageService.getMessage(id);
      System.out.println( "get message ["+message+"] at "+new Date() );
      返回消息;
   }

   @RequestMapping(value = "/message/set/{id}/{message}", method = RequestMethod.POST )
   public String setMessage(@PathVariable Integer id, @PathVariable String message) {
      System.out.println( "set message ["+message+"] at "+new Date() );
      messageService.setMessage(id, message);
      返回消息;
   }
}
我们将定义 MessageService class in com.toptal.blog.service. It will access messages stored in our System of Records (SOR). 在生产应用程序中,SOR类似于关系数据库. 为简单起见,我们将使用a HashMap:
@Service
公共类MessageService {
   private ConcurrentHashMap messages
   = new ConcurrentHashMap();

   public String getMessage(Integer id) {
      System.out.从SOR获取数据......" );
      返回消息.get( id );
   }

   public void setMessage( Integer id, String message ){
      messages.Put (id, message);
   }
}
Now, if we export the project as a WAR and deploy it in Tomcat, 我们应该可以设置一个信息, 例如" test_message ", for ID=1, 创建一个HTTP POST请求 http://localhost:8080/EhCacheExample/message/set/1/test_message. 然后,我们应该能够通过HTTP get请求返回“test_message” http://localhost:8080/EhCacheExample/message/1. I used Insomnia 作为一个方便的REST客户端来完成我的测试.
现在让EhCache为我们工作. 只需要几个快速的步骤就可以配置我们的项目以正确运行EhCache.
Add the EhCache Spring注解 dependency in Maven’s pom.xml:
   com.googlecode.ehcache-spring-annotations
   ehcache-spring-annotations
   1.2.0
Spring has a built-in EhCache cache manager, org.springframework.cache.ehcache.EhCacheManagerFactoryBean. This is suitable for most caching situations, 但是我发现定义一个自定义缓存管理器是有用的,因为它允许我以编程方式控制缓存, 或者使用注释, 使用相同的缓存管理器. 本文主要讨论注释, 但让我们继续定义一个自定义缓存管理器,以便在需要时做好准备. 如果您更喜欢使用默认的缓存管理器,可以跳过这一步.
中定义这个新类 com.toptal.blog.cache.CustomCacheManager:
public class CustomCacheManager extends net.sf.ehcache.CacheManager{

   公共CustomCacheManager () {
      super();
   }

   /*添加你自己的缓存方法.
    *
    *公共无效myCustomCacheMethod(){
    * //你的代码在这里
    * }
    * */
}
通过更新启用它 springrest-servlet.xml as follows:
...
Finally, create the EhCache configuration file ehcache.xml 在类路径中. 默认情况下,Eclipse将包含 src / main /资源 在类路径中, and we’ll place the file here. This file is required for EhCache to function properly. 它定义了每个缓存的缓存名称和一些属性,例如 timeToLiveSeconds:
现在,一切都设置好了,准备好了,使用EhCache应该是轻松愉快的工作. 我们可以简单地加上 @Cacheable 到我们想要缓存的方法或类. 例如,我补充道 @Cacheable to the getMessage method in MessageService. It’s that easy!
@Cacheable(cacheName = "messageCache")
public String getMessage(Integer id) {
   System.out.从SOR获取数据......" );
   返回消息.get( id );
}
来测试我们的缓存是否正常工作, we can create a message for ID=1 by issuing an HTTP POST request at http://localhost:8080/EhCacheExample/message/set/1/newMessage,然后使用get请求多次获取ID=1的消息 http://localhost:8080/EhCacheExample/message/1. 如下面的控制台输出所示, web服务要求SOR在我们第一次请求消息时获取消息, 但接下来的两次请求就不是了, 而是返回缓存的消息. 因为我们定义了 timeToLiveSeconds 如果为10,则web服务在10秒后调用SOR以再次获取消息:
set message [newMessage] at Sun Dec 06 23:55:39 MST 2015
get message [newMessage] at Sun Dec 06 23:55:42 MST 2015
从SOR获取数据......
get message [newMessage] at Sun Dec 06 23:55:47 MST 2015
get message [newMessage] at Sun Dec 06 23:55:49 MST 2015
get message [newMessage] at Sun Dec 06 23:55:54 MST 2015
从SOR获取数据......
Now, we are enjoying the speed and convenience a cache gives us, and EhCache is nice enough to refresh by itself every 10 seconds. 但是,如果我们希望在SOR更新后立即刷新它,该怎么办呢? EhCache Spring Annotation提供 @TriggersRemove 在调用带注释的方法时从缓存中删除指定的键. 在我们的消息服务API中,缓存的消息应该从缓存中删除 setMessage is called. 因此,下次a getMessage request comes in, the cache will fetch a fresh record from the SOR:
@Cacheable(
   cacheName = "messageCache",
   keyGenerator = @KeyGenerator(//方法名不包含在缓存键中以与@TriggersRemove一起工作
                     name = "HashCodeCacheKeyGenerator",
                     properties = @Property( name="includeMethod", value="false" )))
public String getMessage(Integer id) {
   System.out.从SOR获取数据......" );
   返回消息.get( id );
}

@TriggersRemove (
   cacheName = "messageCache",
   keyGenerator = @KeyGenerator
                     name = "HashCodeCacheKeyGenerator",
                     properties = @Property( name="includeMethod", value="false" )))
public void setMessage(@PartialCacheKey整数id,字符串消息){
   messages.Put (id, message);
}
A key generator is used by the cache manager to generate the cache key. A list of pre-defined cache key generators can be found here. By default, @KeyGenerator 使用方法名和传入的参数来生成缓存键. 但是既然我们想要 setMessage 方法生成与 getMessage and delete the cached value associated with that key, 我们必须仅使用消息ID作为密钥,并消除用于密钥生成的方法名称. 因此,我们设置密钥生成器 includeMethod property to be false 对于这两种方法. Also, since setMessage 有两个参数,我们使用EhCache的 @PartialCacheKey 的注释 id 参数,以指定它是密钥生成器应使用的唯一密钥. Finally, recall that we configured a dedicated cache, messageCache, 对于这种资源类型, 因此,仅为键使用ID不会带来与其他资源类型冲突的危险.
现在,如果我们对ID=1的消息执行几个HTTP请求,如下所示:
HTTP POST: http://localhost:8080/EhCacheExample/message/set/1/newMessage1
HTTP GET:http://localhost:8080/EhCacheExample/message/1
HTTP POST: http://localhost:8080/EhCacheExample/message/set/1/newMessage2
HTTP GET:http://localhost:8080/EhCacheExample/message/1
控制台将显示:
set message [newMessage1] at Tue Dec 08 17:53:44 MST 2015
get message [newMessage1] at Tue Dec 08 17:53:47 MST 2015
从SOR获取数据......
set message [newMessage2] at Tue Dec 08 17:53:50 MST 2015
get message [newMessage2] at Tue Dec 08 17:53:53 MST 2015
从SOR获取数据......
The final project structure looks like this:

在这个例子中,我们首先创建了一个简单的Spring MVC RESTful web应用程序. Without modifying even one line of the existing application code, 然后我们使用EhCache Spring annotation无缝地将EhCache集成到应用程序中. 我们已经展示了EhCache Spring注解既易于安装(通过添加Maven依赖项),又易于使用(通过向方法添加注释)。.
可以找到EhCache文档 here and the EhCache Spring注解 documentation is here.
Also, check out the sample project described in this article on GitHub.
世界级的文章,每周发一次.
世界级的文章,每周发一次.


 作者都是各自领域经过审查的专家,并撰写他们有经验的主题. 我们所有的内容都经过同行评审,并由同一领域的Toptal专家验证.